Showing posts with label Clinique. Show all posts

Friday, May 15, 2015

Clinique Cheek Pop in Pansy Pop: Swatches and Review

Clinique Cheek Pop in Pansy Things are hectic right now here at Panda Headquarters, but I wanted to share this review before the weekend got underway, especially because I love this blush so much that it will be on my face tomorrow at my Master's graduation. That is high honors for a blush, I tell ya!

But before I begin, there is a bit of a story with this one. My momma and I have been looking for these new colors forever. When they first launched, even our Clinique SA's had no idea there were new colors! (Does this ever happen to you?). My Ulta has had an empty display where they are supposed to go for a month. Sephora was picked over/sold out. What was a girl to do?

Finally my momma and I begged the Clinique SA's to go check the stock at Nordstroms to see if they were in. Hmm...they were! The SA's were going gaga over these blushes like they'd never even heard of 'em! Case in point, I got to be the first to swatch the brand new testers and left with the color Pansy, a gorgeous lavendar pink. Patience is a virtue!


Pansy Pop (15) retails for $21 and should be able to be found at Sephora/Ulta/Clinique. After swatching some of the colors and seeing dismal pigmentation, Pansy blew me away and I snatched it up!

Clinique Cheek Pop in Pansy
Pansy Pop is unlike any other blushes I own. I may not have a big stash of blush, but I have mostly pinks, corals, and reds, but nothing cool-toned like this. I've been wearing it non-stop! It lasts for 8 hours on my combo skin and has the dewiest glow to it. I feel that this shade works best applied in layers with a stippling brush for the perfect finish!

Clinique Cheek Pop in Pansy
 I love the unique hue, the wear, and the finish so much I will be wearing it tomorrow, on one of the most momentous days of my life to date! Yay Clinique Cheek Pops!

Do you have one (or all?) of these?

Sunday, March 15, 2015

Cinderella x MAC Free As A Butterfly Lipstick and Cinderella FOTD

Image Source


I will be the first to admit that Cinderella is not my favorite princess, but I have been beyond excited to see the new Cinderella movie for months now. It may have to do with a combination of things: the impeccable Lily James, Kenneth Branagh directing, Helena Bonham Carter as the fairy godmother...my British-loving heart soars! But the promised beauty of the whole movie---from the costumes to the makeup also made me eager to see it. 
 
I am not a huge fan of MAC right now, especially their limited edition collections. It seems they pump out too many and the quality is never there, but I caved for the Cinderella collection. With a gift card I was able to snag only one lipstick, as most things had sold out by the time I got around to ordering. It is mostly a collectors' item for me, but this post will be a review of the lipstick (probably not useful since I am not sure where you can get it, but maybe fun?) and the FOTD that I wore to go see the movie this afternoon!
MAC Cinderella Free As A Butterfly lipstick
The lipstick I got is 'Free As A Butterfly', which honestly, as a name, confused the heck out of me. But if you see the movie, it becomes more apparent. There are butterflies everywhere! It was $17.50, and comes in a gorgeous pale blue/purple shift tube with the gold Cinderella logo. Free As A Butterfly is a nude/champagne glitter.

Gorgeous right? But as I feared, it isn't very pigmented. This makes a good topper to another lip look because it settles into my lip lines when worn alone and almost gives me zombie-lips. But the nice, typical vanilla-MAC scent and the comfortable wear make me wanna swipe it on anyway, even if it will settle in ten minutes' time.


It isn't the most horrible lip look, especially not from far away, but it may not be your cup of tea on it's own. However, I will cherish it because my mom's favorite princess is Cinderella and anything Cinderella reminds me of her. Naturally, she was my date to the movie!

To prepare for this momentous occasion, I had to do a FOTD (which the lovely ticketing girl noticed. WIN). I was inspired by the promo images and the image I put at the beginning of this post---that dress!


I went with blue eyes, peachy cheeks, and of course, Free As A Butterfly on the lips.

Cinderella FOTD

Below are the products I used:

From left to right:

Benefit Roller Lash: Jury is still out on this one. Review coming soon!
NYX Tinted Brow Mascara in Blonde: A lovely, basic tinted mousse.
Bare Minerals Morning Glow loose shadow: I used this as a highlight on my eyes. It is a pearlized pink shimmer and gave just the right amount of sparkle.
NYX Jumbo Pencil in Milk: To prime and make the baby blue color pop.
Clinique Clubby Stick in Big Blue: Washed over the lid.
Rimmel Scandaleyes Waterproof Khol Liner in Light Blue: Used on lower lash line.
Obsessive Compulsive Cosmetics colour pencil in Pool Boy: Also on lower lash line to pop the edge of the black liner.
MAC Free As A Butterfly lipstick: One light wash on lips.
Sleek Makeup blush in Rose Gold: On cheeks
I also used a L'Oreal black felt tip liner and IT Cosmetics foundation and concealer (not pictured).

Have you seen the movie? I highly suggest it! I might try to recreate some of the looks. The stepsisters' looks were crazy awesome!

Monday, June 30, 2014

Clinique Chubby Stick Shadow Tint for Eyes in Grandest Gold

Grandest Gold ($17) is one of Clinique's new shades of Chubby Sticks for eyes, and it is great for a sheer wash of low-maintenance color.
Clinique Chubby Sticks for Eyes in Grandest Gold
The Chubby Sticks are a favorite of mine because they are easy to carry around, travel with (I'm travelling with it right now!), and apply. Just swipe on your lids over some primer, blend out with your finger, and you are all set.
Clinique Chubby Sticks for Eyes in Grandest Gold

This is a pearlescent shimmer with a slightly golden hue. It is very flattering as an allover wash of color, to highlight the brow bone in a subtle way, and can even double as a highlighter on cheeks or the bridge of your nose in a pinch.

Clinique Chubby Sticks for Eyes in Grandest Gold

This gives the prettiest sheen to skin (and yes, I am translucent, I know). I love wearing it sheer, but you can layer it (just give it a few seconds to set between layers because this is a creamier formula) and build up for more shimmer. These last about 7 hours on my oily lids with primer, but any creasing can be smoothed out with a finger.

There is also a brand new Periwinkle shade that looks fun!

 photo panda-sig_zps4a356226.jpg

Tuesday, June 3, 2014

Summer Skin Saver: Clinique Moisture Surge CC Cream


The weekend snuck past me, but it did give me a little extra time to test the Clinique Moisture Surge CC Cream, giving me 3 1/2 weeks of testing time, including one while traveling abroad. This little CC Cream has been put to major tests during that time, so how did it fare?

Clinique Moisture Surge CC Cream

I have to admit, I was very hesitant about shelling out $35 on a CC Cream, but I was under some duress. I was about to leave on a whirlwind trip to Hong Kong a few weeks ago, and I did not want to bother with foundation. However, I had to be presentable and polished at some fancy gatherings...

What was a girl to do?

My momma talked me into buying this, and heck, did I not want to at all. I tend to loathe tinted moisturizers and BB and CC Creams because of the lack of coverage and the too much moisture on my already combo/oily skin. Not to mention I knew I was going to be in 80% + humidity in Hong Kong. I just had visions of this melting off my face into a puddle of disaster.

In the end, I paid my $35 and immediately went home to put this on to know if I needed to take it back before the trip. I squirted out a dime-sized amount (more than enough for a whole face) and gently rubbed it in. I was impressed. My face looked nice, even, and dewy, but would it last all day?

Clinique Moisture Surge CC Cream in Very Light swatch

Above is a drop of the CC Cream, then it swatched, and then lightly blended. The color that I picked up is Very Light, which is part of Clinique's 'Very Fair' coloring group. Be aware that this is something you should swatch or test in store because usually I am the lightest shade that Clinique makes in everything, but Very Light is marked as the fourth darkest shade (and in my opinion, the 'lighter' shades are much more orange).

What does it do:
100% fragrance free
Does not clog pores
SPF 30
Oil Free

The Wear Test:
I wore this CC cream in all types of environments. I wore it for a 12 hour work day in California heat, through monsoon rains in Hong Kong and during sticky, humid days there as well. I have also worn this under both liquid and powder foundations. It has become my staple every day for the last month and I am so incredibly glad that I have it. I will be taking it with me to Hawaii as well, because this really does stand up to humid weather, even on combo skin. A little setting powder and blotting a few times will keep this fresh and the light coverage does not make you feel constricted in the heat.

Tip:
I find this applies best when you rub it into your skin like a lotion or sunblock. In this way, you can easily layer and it does not look like it is sitting on top of your skin. It is a bit of a learning curve, but that means no dirty brushes. I still have at least 3/4 of a tube left, so I anticipate this lasting me another 2-3 months. I also feel this works best without a primer. I tested it specifically with the Clinique primer and found it faded faster. Odd!


Here is my face wearing nothing but the Clinique Moisture Surge CC Cream and a hint of mascara. This picture was taken after an 8 hour workday. I blotted once during lunch. No, my skin is not perfect, but I am coming to terms with my minor blemishes and I feel naturally beautiful while wearing this CC Cream.

What is your favorite CC Cream?


 photo panda-sig_zps4a356226.jpg

Monday, May 26, 2014

Hong Kong Essentials


Now, I know many of you may not be traveling to Hong Kong in the near future, but I wanted to show you the staples of my makeup bag while I was there. Hong Kong's weather is very much like the southern United States in the summer---hot and very humid (think 85 degrees F and up, and up to 90% humidity daily). In fact, the weather is like any tropical region as well-- including Hawaii, so if you are hitting up a humid spot this summer, this just might come in handy!


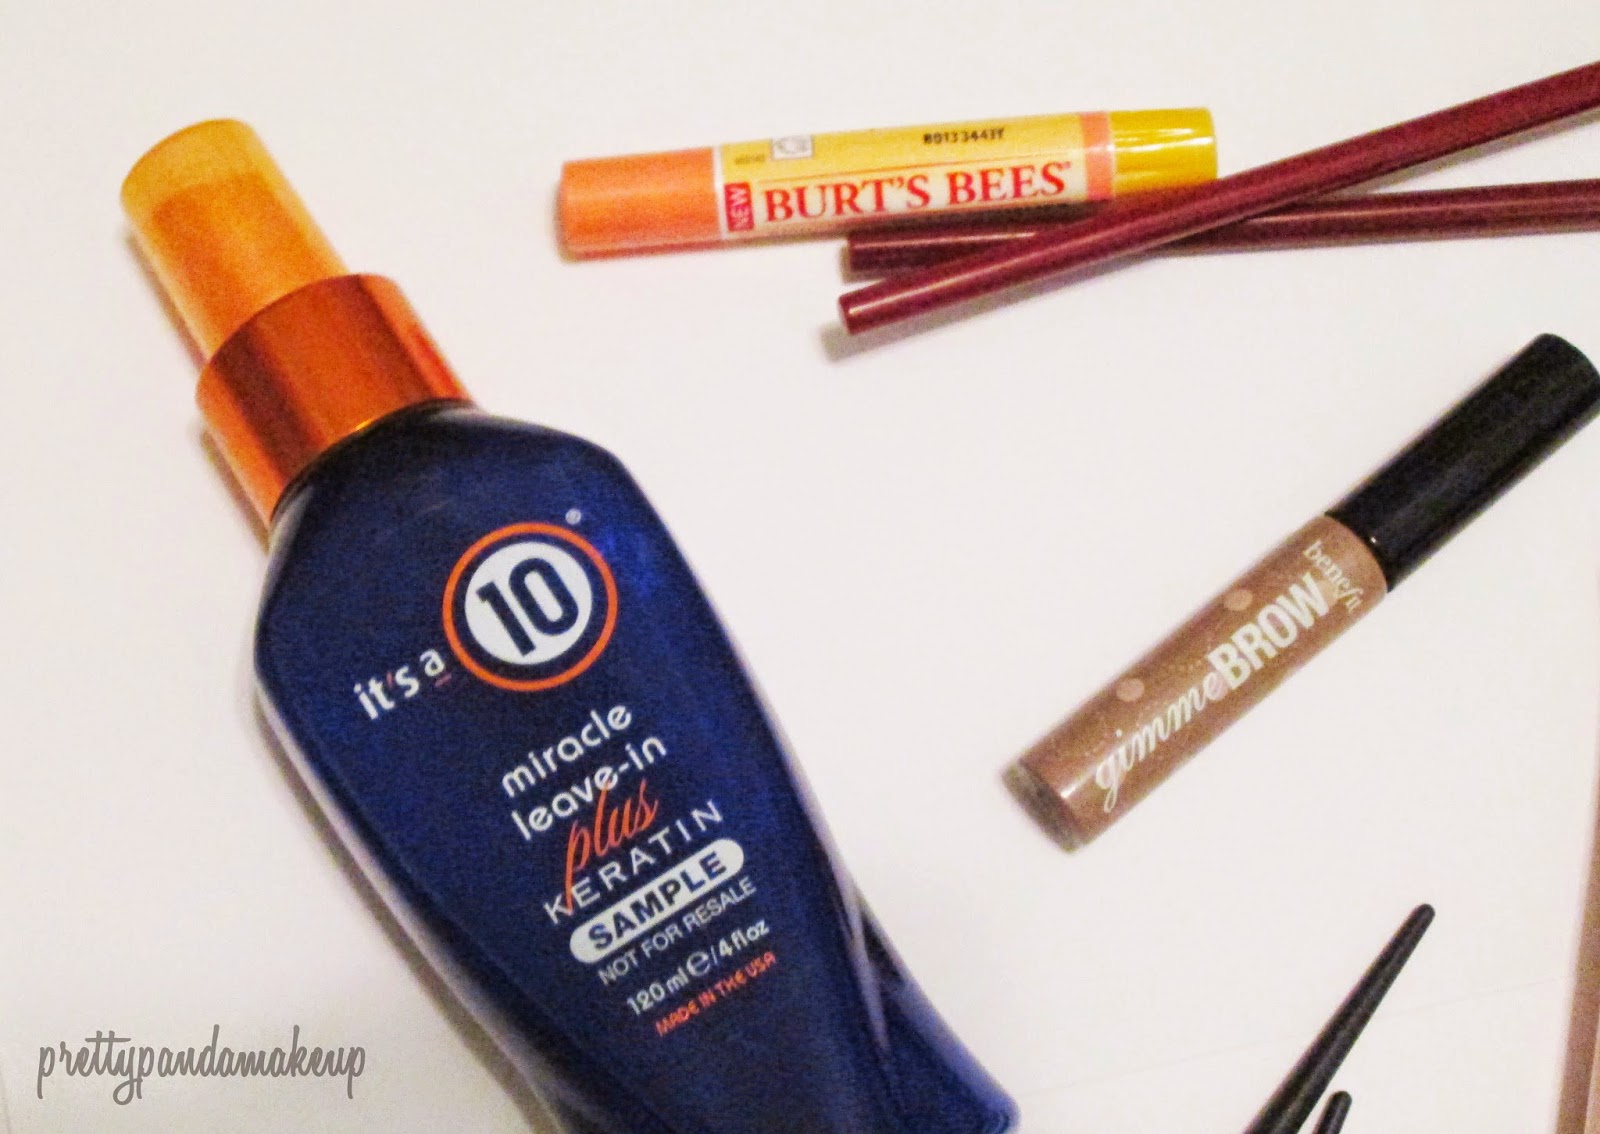
Above are the very bare bones of what I brought ( I brought more, but these were the workhorses) mixed in with some of my kitschy finds!


1. It's a 10 Miracle Leave-In Plus Keratin ($18): I received this free with an Ulta order (you can pretty much get this free at Ulta all the time) and a few spritzes made my hair look awesome, even with the crappy hotel blow dryer and the crazy humidity.

2. Burt's Bees Lip Shimmer in Apricot ($4.99): This perfect peachy color and thin tube meant I could stick this in a pocket and I never looked overdone during the daytime of crazy touristy things!

3. Benefit Gimme Brown in Light/Medium ($22): A no fuss tinted brow gel that kept me polished for nice dinners out but never smudged or ran, even when I was 'glistening'.


4. bareMinerals Ready blush in The French Kiss ($22): Great staying power and a universally flattering color!

5. Clinique Moisture Surge CC Cream ($35): A larger review of this will be up soon, but this kept me looking gorgeous (and people complimented my skin) even when it started pouring with monsoon-status rains.


6. NYX Collection Noir Liquid Black Liner ($5.99): Has officially made holy grail status as a black liner for me, especially since it withstood extreme humidity for up to 15 hours straight.

7. Jack Black Intense Therapy Lip Balm in Grapefruit ($7.50): With SPF 25 and a cheery scent, it wasn't so hard to perk up from the jet lag with this.

8. NYX Matte Blotting Paper ($3.99): Blotting papers are a must in weather like Hong Kong's, and these are my favorite!


What are your favorite hot and humid weather products?

Oh, and more photos!


Above is my favorite pastel-colored building, the Stanley beach, and the entire city at night from the tallest point!


 photo panda-sig_zps4a356226.jpg

Monday, April 7, 2014

The Fair Foundation Files and My Take on a Classic Look for Spring


The extensive testing process is over and I have come to a lot of conclusions about Rimmel's Stay Matte Liquid Mousse Foundation in shade 010 Light Porcelain (retail $4.99 at Ulta, but I received it complimentary from Influenster).


So, what does this wunderkind have to offer us?

  • Cheap price tag at around $5 depending on location
  • No added fragrance as far as I can tell
  • Totally matte
  • Fun mousse texture
  • Lots of light shades


It claims to offer 'lightweight shine control' as well, but we will get to that claim.

The texture of this is a mousse and is very fluffy, so you will think you need more when you actually don't. A little goes a long way---a lot gets cakey fast. This can be used with fingers, a BB, a flat brush, or a round foundation brush. I have tried all methods and they all basically work the same.


Here is me wearing Stay Matte in Light Porcelain all over my face. It almost covers my hardcore cheek hormonal blemishes, but a little dab of concealer fixes them right up. I just wanted to show you with only this product.

You really need to moisturize and prime well. Even if you have oily skin, this will get into every pore and every fine line. But if you prep well, this can have great results.

My results have been nothing less than spectacular. For over a week, this foundation (Clinique moisturizer and primer underneath) has keep me completely shine/oil free for 12-15 hour days. I have worn this during busy work and school days and I also wore it to a 95 degree day at the Huntington Library (for you non-Californians, it is beautiful, but mostly outside and was hotter than the sun that day). No shine whatsoever. 

But before you go running out and buying this, I have a few words of advice....

This may work for me, but I feel this will probably be a seasonal product for me. It takes a ton of prep time for me to look flawless with it (I have larger pores and my cheeks run drier). Also, I do not see this as 'lightweight'. It certainly isn't heavy, but I would say you can feel it on your skin.

Also keep in mind that this tends to oxidize in my experience about half a shade. If you have a chance, try a test patch on your skin first. Ulta let me return the first shade I bought before the Influenster box with no problem (that shade was Light Ivory, the next one up from this, and ran too yellow).

Overall: If you are drier on at least 50% of your face or have a lot of fine lines, this might be a nightmare for you. Oily girls...grab this and throw away your blotting linens forever.

Now, onto the fun stuff...I decided to make a look for Influenster and @RimmelLondonUS for the #StayMatteSwitch movement.

This is my twist on a classic look---for Spring! Substituting my normal red lip for something pinker and of course, matte skin!


What I Used:

1. Rimmel Stay Matte Liquid Mousse Foundation in Light Porcelain ($4.99)
4. Benefit They're Real Mascara ($23)
6. Nude browbone shadow from Wet N Wild 'Drinking a Glass of Shine' Palette ($4)
7. NYX Collection Noir Liquid Black Liner ($5.99)


This is a routine I rely on for early morning to still feel fun and fresh

1. Prime, get that foundation on your face---any way you like---and then conceal!
2. Set with powder
3. A little blush on the apple of your cheeks. Something dewy works well!
4. Curl lashes and apply mascara
5. A nude matte wash of shadow on your lid is simple and a no-makeup look
6. A liquid liner baby cat eye keeps things classic
7. A hint of brow keeps things looking put together
8. And a glossy coral pout keeps things fresh!

What is your go-to Spring look?

 photo panda-sig_zps4a356226.jpg

Tuesday, March 25, 2014

Clinique Cheek Pop in Peach Pop: Swatches and Review

Spring is in the air, and I had to pick up one of the most talked about blushes---Clinique Cheek Pop in Peach Pop!
Clinique Cheek Pop in Peach Pop
 I picked up 02 Peach Pop ($21) because it is more unique to my stash than the other colors. I only have a few peach blushes and this is different from all of them. I seriously have nothing like it and I love it!
Clinique Cheek Pop in Peach Pop

And how can we ignore the awesome embossed flower and adorable clear casing? So fresh! Love it Clinique. 

Clinique Cheek Pop in Peach Pop

The color is pigmented, but still buildable. What I mean by this is that you aren't going to dip into this and then have instant clown cheeks. The luminosity to these blushes keep them fresh but don't emphasize pores either.

Clinique Cheek Pop in Peach Pop

The peach in this blush isn't too apparent, but it balances out the pink hues just enough to brighten up your complexion in a new way without looking too editorial.

Clinique Cheek Pop in Peach Pop

I am wearing one dip into the pan on both of my cheeks above. I just wanted a light wash of color, but Clinique Cheek Pops can provide this and more of a full opacity look. I am so in love with this blush!

Do you own it? Love it? Need it? Do tell!


 photo panda-sig_zps4a356226.jpg

Friday, March 21, 2014

Let's Talk Eye Care

Besides a neck cream, I also needed an eye cream. I have been using Clinique's All About Eyes, but wanted something to ease and prevent fine lines...sadly, I have a few already. So, I looked into Neutrogena Healthy Skin Eye Cream ($11.99). As far as drugstore brands go, I trust Neutrogena. They have science that makes sense; I like that.


One of the main draws for me for this eye cream was that it deals with the three things I need: fine lines, moisture, and firmness. It is also fragrance free, which was a must for me, as my eyes are very sensitive.


One of my favorite things about this eye cream is the applicator. Instead of just a tip, the tip flares out, which creates a perfect dollop of product every time. At least that is what I experience the benefit to be, but if you know why else you would want an applicator like this, let me know!


A dollop of this size is perfect for both under eyes and outer upper lids (I place a bit on my browbones as well). It also wears beautifully under makeup and does not irritate anything. I have been using this for two weeks and my fine lines around my eyes are starting to become a bit blurry, but the real noticeable difference is in the moisture level of my under eye.

Do I think this is a HG eye cream? No. But it does what it says for my younger eyes and I hope it continues to impress me down the road.

Here are my tips for healthy eyes:

1. Don't rub! If you have allergies, get eye drops, or try and soothe them in another way (take off your makeup/cool compress) because that rubbing creates fine lines! Trust me, I have major allergies and was a eye rubber up until recently.

2. Remove makeup gently. Plan ahead so that you do not feel the need to scrub at your eyelids because you are in a hurry. Also, use waterproof makeup remover, or a dual-phase product. Gently press the product on a cotton pad against your eye and gently massage. Don't force the issue!

3. Sunscreen and sunglasses---enough said!

4. Careful what you put on your eyes and how you apply it. Seriously ladies and gentlemen, we are above buying scratchy no-name eyeliners. That stuff is not good for that delicate tissue! Be careful and don't use anything that tugs or pulls.

5. Eye cream. Whether it be this one or your own favorite, find one now and pat it on twice daily. Your future self will thank you!


 photo panda-sig_zps4a356226.jpg

Sunday, March 2, 2014

My Very First Empties Post: February 2014

I have never done an empties post on the blog, and I don't plan on boring you by making it too long, but this year, I am all about using up what I have bought with my money! Why waste it?

This months' empties are a small group, but I feel proud nonetheless! All of the items are linked back to original reviews if I have them.


February 2014 Empties:

Clinique Dramatically Different Gel Moisturizer $14.50 for 50ml: This lasted me about 4 months, and I used it every single day, sometimes 3 or 4 times. Not bad! I already replaced it with the original lotion formula because my skin is really dry, but the gel is great for summer months.

Maybelline Babylips SPF 20 in Peppermint $2.99: These are easy to use up with regular application. One lasts me about a month, 2 weeks if it is my only balm.

Mini Vaseline Lip Therapy $2.00: Love these little pots for everything! This lasted me about 6 months. Used mostly as a night lip treatment.

Smith's Minted Rose Lip Balm $6.00: Started using this at the beginning of January very regularly (2-5x a day) so I say this is a pretty good value. Need more!


This is my final empty--- Parasol from the Tarte Aqualillies Palette from last year ($38). This gorgeous nude has been a staple in my everyday eye looks for the last 6 months straight, and off and on when I first got it almost a year ago. Crazy how long one shadow lasts! I am still gonna use up that last bit, but I wanted to show you a bit of the color.

Did you empty anything this month? Feel free to link me your February Empties!


 photo panda-sig_zps4a356226.jpg

Saturday, January 11, 2014

I Want To Look Like: Narcissa Malfoy

Hey everyone!
I honestly couldn't be more excited for this post. It is going to be a long one, and picture heavy, but hopefully really fun! The 'I Want To Look Like' series will be ongoing, and is something I have wanted to do for a long time. I will be getting inspiration from characters in movies/tv shows/actors/ads/etc, and of course...any suggestions you have! Each post will include the original look, and a look modified for daytime wear. I will also include all the products used, and there will be posts on my two other blogs, Miss Molotov and Impressionist Nails to help round out the look.
Let's get started!
For my inaugural post, I chose Narcissa Malfoy. Being a huge Harry Potter fan (and nerd in general), she is someone I have always loved. Her style progresses throughout the films (sadly mentioned next to no times in the books), from very classic and stuffy to darker and more natural. These looks aren't a complete copy of her makeup, but are inspired by her.
I also had a ton of fun with photoshop and being a geek with this in general. It was fun trying to get that 'Malfoy' attitude while posing. I don't have half-blonde hair though, but we will have to make do. And Helen McCrory is flawless.
Both of my looks started with the same base products:

1: NYX Jumbo Eye Pencil in Milk: Used as a base/primer on eyes.
2. Clinique Even Better Foundation in Alabastor: My base of choice right now.
3. Cocoa Star Too Faced Shadow from the Natural at Night Palette: Used to fill in brows. Heavy in the first look and lighter in the secocnd.
4. Amazing Cosmetics Amazing Concealer in Fair: Under eye
5. NYX Liquid Black Liner: A larger wing on the first look, and simpler on the second.
6. Benefit They're Real Mascara
Here is the first look---full on Narcissa glam.

For the full look, I used the products below:


1. bareMinerals loose shadow in Treasured Terri: Foiled and used on whole eye.
2. NYX single eye shadow in Exotic Green: used in crease
3. Mally Ever Color Automatic Eyeliner in Fierce Forest: used on bottom lash line.
4. Essence Renesmee Red blush: No longer available, but any red blush will do.
5. Essence Bella's Secret: for highlight.
6. NYX Retractable Waterproof liner in Red: line lips
7. Urban Decay Revolution Lipstick in F-Bomb: Fill in lips with the perfect Narcissa-red.
8. bareMinerals Marvelous Moxie gloss in Game Changer: a dab on the middle of the lower lip.

This look was so fun to do, but now, let's lighten it up for everyday wear!


For the softer version, I used the following products:


1. Clinique All About Shadow Quad in On Safari: used the cream as highlight, olive on the whole lid, and forest green on the crease.
2. Milani Baked Blush in Red Vino: a little on the cheeks gives a strong blush and highlight.
3. Sephora Flashy Liner in Flashy Ultra Green: on lower lash line.


I had fun playing with all of my green shadows, and a ton of fun doing this in general!

For Narcissa inspired nail polishes...click HERE.
For Malfoy-worthy accessories...click HERE.

Hope you enjoyed! If you have someone you would like me to do a feature on for the next volume of "I Want To Look Like..." tell me in the comments!

xx
 photo panda-sig_zps4a356226.jpg